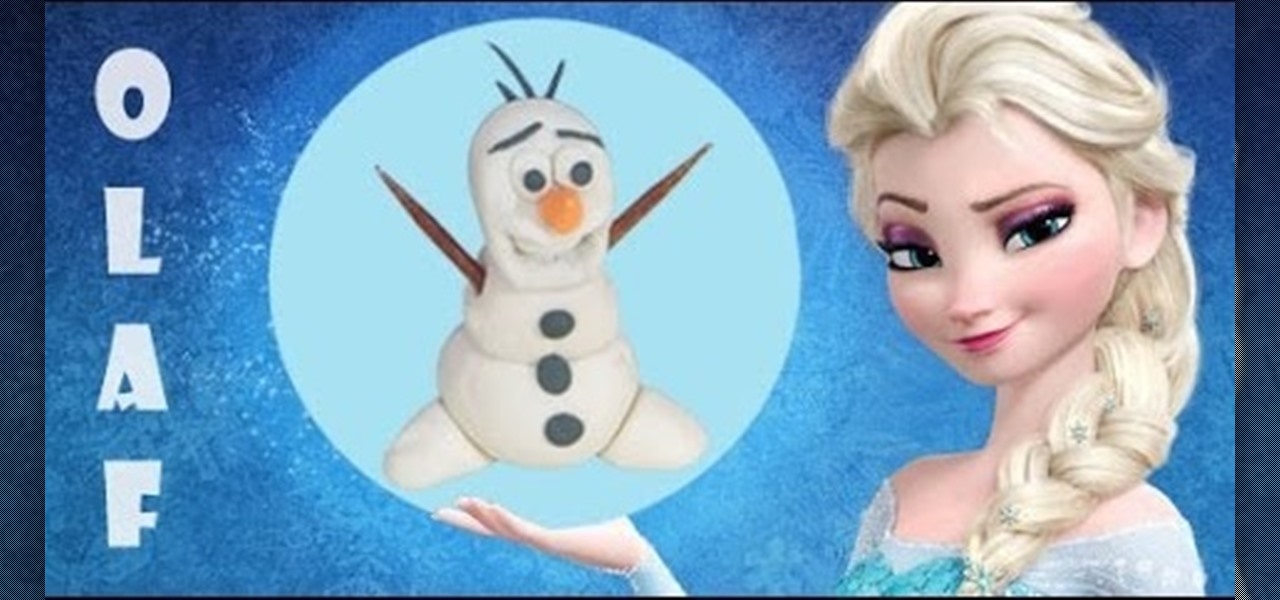

Here is a tutorial to show you how you can easily make this much loved Frozen character with Play-Doh. Using some simple techniques and clever tricks, you can make your very own Olaf.
Everyone loves Olaf the snowman from Frozen. Elsa, the Snow queen, and her sister Anna make Olaf -- a talking snowman who loves summer. A hit with the kids, Olaf is really adorable and funny. One of the most loved Disney characters, Olaf teaches us that some things are worth melting for.
So.. do you wanna build a snowman?
Step 1: Olaf's Head
We start off by making Olaf's face. Take a considerable amount of white playdoh and roll it roughly into a thick diamond. Push your finger in the center, making an opening and work your way till it resembles Olaf's mouth.
• Teeth - Take a little bit of white playdoh and roll it to form a rectangle. Make sure that it is just wide enough to fit into the opening that you have made for the mouth.
• Nose - Roll orange playdoh to form a tiny carrot. Place that just above the mouth.
• Eyes - Take 2 white playdoh balls. Flatten them and stick them above the nose. Make 2 black playdoh balls - smaller than the white ones. These will form olaf's pupils. Put them onto the white balls. Finish the eyes off by making thin eyebrows from black playdoh.
• Hair - Lastly, finish off the head by taking 3 very thin black cylinders (similar to what you made for the eyebrows) and placing them at the back of Olaf's head.
Step 2: Olaf's Body
For the body, you need to make 2 white balls - one just a little bit smaller than his face. That will form the base of his body. The other ball should be smaller than this one - this will form the torso.
• So take the bigger ball for the base and pass a toothpick or stick through the middle. Take the one for the torso and pass it through so that it rests on top of the base.
This will make sure that our Olaf does not fall down, and is able to stay upright.
• To finish it off, take 3 small black playdoh balls - flatten them and place them evenly on the torso and base. These will make for the buttons.
• Next, fix the head on top of the torso by passing it through the stick.
Step 3: Olaf's Hands and Legs
• Hands: Take another stick. Break it into half. Color both the halves brown. These sticks make for Olaf's hands. Alternatively, you can use twigs or toothpicks as well.
• Legs: For Olaf's feet, make 2 medium sized balls. Use a stick to secure them to the base.
Your Olaf is now ready!
Just updated your iPhone? You'll find new emoji, enhanced security, podcast transcripts, Apple Cash virtual numbers, and other useful features. There are even new additions hidden within Safari. Find out what's new and changed on your iPhone with the iOS 17.4 update.


Be the First to Comment
Share Your Thoughts